How to Create a Wix Website in 6 Easy Steps From an Award Winning Wix Designer in Utah
- Dave Bollard

- Dec 24, 2020
- 5 min read
Want to make a Wix website? Here is how you do it with this step-by-step Wix tutorial from UTCREATIVE. If you run into any problems or would like me to put a website together for you… contact me.
Let’s cover how to…
Sign up with a Wix account
Wix’s user interface
Template – Find one that works
Wix Editor - Design and customize your website
Wix Apps - Adding extra functionality
Publish - your Wix website
Wix: the introduction and how to create a website
Wix is a solid website builder option. It will get everything you need to get done for a great website building experience.
Quick look at the highlights of using Wix:
It has a visual, drag-and-drop editor – Easily customize any template without needing to touch a line of code.
500 highly optimized, customizable, and eye-catching templates.
Artificial intelligence design tool – Wix can create a website for you using its artificial design intelligence tool (ADI).
Wix Apps – The Wix app marketplace contains both free and premium apps, including business, promotional, and blogging tools.
eCommerce functionality – Wix includes everything you need to sell some products.
Built-in hosting, security, and maintenance – Because Wix is a fully hosted solution, hosting, security, and the maintenance of your website are all taken care of for you.
Support – Wix has a well-organized knowledge base to help you get started. You can also submit a support ticket or chat on the phone to one of the help team if you have a problem.
Ready for the fun part? Here’s how to make a website with Wix…
1. Create a Wix account
First you need to register for an account then yo will be able to create your Wix Website. Open the Wix homepage and select Get Started. Enter your email address and create an account.
The sign up process is easy. Answer a few short questions about your new website and then you are complete. Next, you will be asked whether you want to create a website within the Wix Editor or let the Wix ADI tool design a website for you…

2. Let Wix ADI create a website for you
Although Wix’s artificial intelligence designer (ADI) is a useful tool, its design and customization options are limited compared to the Wix templates and editor. Therefore, if you have a basic understanding of website design (and I mean basic), you can click here to skip ahead to Step 3 and choose your own template.

However, if you are totally new to building a website, then Wix ADI may be a good option for you.
After selecting Start Now, the tool will then ask you a few questions about your new project. Make sure you carefully choose the design options that most appeal to you as the ADI tool will design a website based on your answers.
Your new website will then open within the ADI Editor.
Mastering the ADI editor
The ADI Editor is easy to navigate. But here are just a few pointers to get you started…
Elements – Click on an element to customize it. The settings for a selected element will appear in the left-hand menu bar where you can then make any necessary alterations. Options include changing the images, writing text, adding buttons, and more.
Add a Page – Select Pages > Add Page from the top menu bar. Then select from a range of new page types and pre-made page templates.
Design – Click on Design in the top menu to change your website’s theme and layout, or alter global colors, fonts, and more.
However, if you want more control over your website, you’ll be better off skipping the ADI and selecting your own template (which is my recommended method).
3. Choose a Wix website template
To get started with the Wix Editor, select Choose a Template.

To find designs that match your site, you can filter the templates by category, and you can also View each template in demo mode. Once you have found a template that fits with your project, select Edit.
4. Customize your website with the Wix Editor
Once you select a template, you’ll be able to customize it in the Wix Editor using simple drag-and-drop editing.
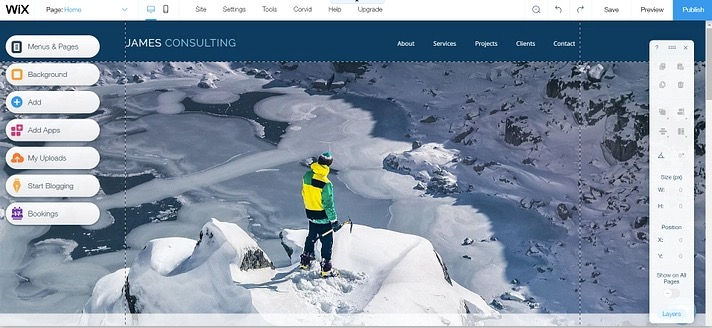
To get started, click on an element on the page to alter its settings, resize or reposition it, change colors, rewrite text, and much more. Any changes you make will appear in real-time, so you’ll instantly know how your site will look to visitors.
For further customization, you’ll use the options in the menu on the left-hand side. Let’s go through what you can do here…
Menus and pages
Under Menus and Pages, you will find your site’s pages. Here you can add new pages, as well as rename, hide or delete pages, and change the order that they appear in the menu.
This is also where you can access your pages’ Setting options, which house a few key options:
SEO – Add metadata to each page to help your content get found in the search engines.
Social Share – Add the images and text that will be displayed when each page is shared on social media.
Permissions – Select who can view each page and create restricted content or members-only pages.
The Background

Wix allows you to change the background color or image, or display a video background. Wix has an extensive free media library to select from or you can upload your own media.
Elements
Add, you can add a wide assortment of elements to your website pages including…

Galleries and images
Interactive slideshows
Videos and music
Buttons
Forms
To add an element to your site, drag and drop it in the appropriate place on a page.
Blog manager
If you want to add a blog to your website, select the Start Blogging icon. Then click on Add Now to add the Wix Blogging Manager app to your website.

Under My Blog, click on Create New Post. Here you can add and publish new posts within the Blog Manager.
You can also view and manage your posts by selecting My Blog > Manage Posts.
There are a couple of other important Wix Editor features that you can find in the top menu bar. These include…
Page – Quickly toggle between the pages on your site and your blog.
Desktop / Mobile – Switch between desktop and mobile mode to edit your site for both device types.
Settings – Access global settings for your website, add a favicon, view analytics, and much more.
Save / Preview / Publish – It is important to save your website as you go. You can also then preview your site on the front end and publish it when you are ready.
5. Use Wix apps to add new functionality
The Wix App Marketplace offers a variety of free and premium apps that can add extra functionality to your website. To access the marketplace, click on the Apps icon and then browse the apps to find one that interests you.
Here are just a few of the most popular apps currently available…
Online Store – Turn your website into an online store with this powerful eCommerce app.
Wix Events – Easily create and manage your events online.
Instagram Feed – Showcase your Instagram images and videos.
To install a free app, open the app’s page and click Add to Site.
6. Publish your Wix website
To make your website publicly accessible, you need to publish it.
To do so, click Publish from the top menu. However, before Wix will publish your site, the last step in the process is to create your own subdomain or connect a custom domain. For a serious website, you should definitely connect your own custom domain name, rather than using a Wix subdomain.
To use a custom domain, you will need to upgrade your Wix account to a premium plan.
Once you do that, you can publish your site and visitors will be able to access it at whatever domain name you selected.
That’s how to make a website with Wix!
As you can see, creating a website on the Wix platform is pretty painless. Did you run into any problems when you tried to make a website with Wix? Ask away in the comments and we’ll try to help!
If you want UTCREATIVE to create a custom website for you...contact me today.

![[Client Site] Behavioral Health Billing - Quickly becomes Top Billing Website in Utah.](https://static.wixstatic.com/media/8d16ad_7f771105bb344056b7b91025dac549dd~mv2.jpeg/v1/fill/w_980,h_1413,al_c,q_85,usm_0.66_1.00_0.01,enc_avif,quality_auto/8d16ad_7f771105bb344056b7b91025dac549dd~mv2.jpeg)

As an award-winning designer yourself, you make those 6 steps sound incredibly doable—especially for someone like me who’s always second-guessing the layout. I’ve been using https://aiphotoonline.com
As an award-winning designer yourself, what’s your take on balancing Wix’s templates with custom code for unique layouts? I’ve been using https://wanxaivideo.com
As an award-winning designer yourself, I’d love to know which step you find most people get stuck on—I’ve been using https://omni-gemini.net
Excellent advice for homeowners planning improvements. Investing in the best bathroom remodeling creates a modern, efficient space that enhances everyday living while increasing long-term home value.
오랜 시간 쌓인 피로가 완화되는 느낌을 받을 평택출장마사지 수 있었습니다. 덕분에 편안한 환경에서 휴식을 취할 수 있었고 만족감도 매우 높았습니다.